These configuration have been tested only on FreeBSD 12.1-RELEASE.
1. Introduction
Wait… what? FreeBSD does not have Docker! Doesn’t it?
Well of course not really, but you can still install Docker using FreeBSD, it won’t just be FreeBSD in Docker since FreeBSD is not supported as Docker images.
In this blog post, I won’t discuss exactly how to install a few things, I will mostly point to blog posts and documentations so that you know what to do to install Docker and Kubernetes using FreeBSD.
I will not be using Minikube or Kind, not that I don’t like it, but my opinion is that Minikube is nice for quick and dirty small tests and it’s using VirtualBox which is like a big problem to me, but also Bhyve + VirtualBox … choice?!. And Kind is also mostly for tests, it’s closer to an installation with kubeadm, but I really prefer to try things as close to production as possible.
All these have been tested on a PC installed with FreeBSD 12.1-RELEASE. It has a 6 cores cpu, and 32GB of memory.
Here is a quick summary:
2. Details
2.1 Install sysutils/vm-bhyve packages
sysutils/vm-bhyve is a shell based, minimal dependency bhyve manager. And Bhyve is a BSD licenced hypervisor. It’s being heavily developped with FreeBSD, and honestly it’s really well integrated to FreeBSD.
To install vm-bhyve on FreeBSD, you have to be root ofc for good reasons:
# 'sysrc -f /boot/loader.conf vmm_load="YES"'
# Load the 'vmm' kernel module
kldload vmm
# 'sysrc -f /boot/loader.conf nmdm_load="YES"'
# Load the 'nmdm' kernel module
kldload nmdm
# vm on bridge is using tap interface
sysctl net.link.tap.up_on_open=1
# edit '/etc/sysctl.conf', add 'net.link.tap.up_on_open=1'
pkg install sysutils/vm-bhyve
I’m inviting you to go to the vm-bhyve GitHub page and to review its README, it has a lot of interesting informations. Just do not forget to create a switch (vm-bhyve term) and also to add your network interface to that switch.
The next thing is mostly the handling of this package. But one thing about this project is that it’s using bridge. I personaly like to have my bridge free of use, and to use firewall when it’s needed, and to be able to address my VM to my needs, which are generaly to have internet access to ease installations. Which is leading to my next point.
2.2 Configure FreeBSD sysctls to easily bridge out
I’m usually using PF for firewall, and to be able to have my best use of the bridge you can create with vm-bhyve. To this goal, I’m deciding not to firewall the bridge in any way, and to tell PF not to care about bridge it’s quite easy, it’s even a configuration I’m using for VNET jails.
So let’s change the PF behavior with bridge with these sysctls, descriptions:
net.link.bridge.pfil_bridge: Packet filter on the bridge interface
net.link.bridge.pfil_onlyip: Only pass IP packets when pfil is enabled
net.link.bridge.pfil_member: Packet filter on the member interface
commands:
sysctl net.link.bridge.pfil_bridge=0
sysctl net.link.bridge.pfil_onlyip=0
sysctl net.link.bridge.pfil_member=0
You can put these sysctls directly in your /etc/sysctl.conf so that at reboot it’s already configured.
Now you can only care for what’s important, and if you want to firewall your VM, you can always add one inside the VM itself.
2.3 Install Docker
Just follow this blog: How to run Docker on FreeBSD 12
In this blog, the author is telling to get Debian 9 ISO, but you can also get Debian 10, it’s working as well. Once the debian is installed, just don’t forget to follow these two links, I’ve followed them and it’s working:
When you are finished with this section, you should be able to use docker inside the VM, and outside, so on your host.
2.4 Install Kubernetes
Honestly, it should be as simple as search in your favorite Search Engine Install Kubernetes, but the first link you get is this one: Getting started.
So… yes you could follow this link but, this is not the goal!
Instead we want the Real thing, to get closer to a production environment, even if that’s for testing. So you can get there: Installing kubeadm. You can follow everything on this page, it’s not hard at all. But the page only tells you to install kubeadm, kubelet and kubectl.
The hardest part comes with: Creating a single control-plane cluster with kubeadm. And here are my tips:
- When you install docker inside your vm, you installed it with
containerd.io. This Kubernetes page tells you about what’s possible, eitherContainerd.io, orCRI-o, just do not install CRI-o, it’s not needed. - Do not forget to enable Docker in
systemdso it’s launched when you’re VM is started - Do not forget to disable swap
swapoff -a- edit your
/etc/fstabto comment out the swap line
- You have to configure Docker to use the systemd cgroup and restart it, here’s my
/etc/docker/daemon.json:
{
        "dns": ["8.8.8.8", "8.8.4.4"],
        "exec-opts": ["native.cgroupdriver=systemd"],
        "log-driver": "json-file",
        "log-opts": {
                "max-size": "100m"
        },
        "storage-driver": "overlay2"
}
- You have to reconfigure
containerd.ioso that it will use systemd cgroup- reconfigure
containerd.iowith defaults, as root:
- reconfigure
containerd config default > /etc/containerd/config.toml
- then edit the
/etc/containerd/config.tomlfile and changesystemd_cgroup = falsetosystemd_cgroup = true - restart
containerd.io:
systemctl restart containerd
- You should create a
/etc/sysctl.d/k8s.conf, with these values:
net.bridge.bridge-nf-call-ip6tables = 1
net.bridge.bridge-nf-call-iptables = 1
net.ipv4.ip_forward = 1
- and reload sysctl with:
sysctl --system
- If you do not care about default values, you can initialize the control-plane mode with just:
sudo kubeadm init - I’ve install Calico as the Network Pod, since I don’t know a thing for now about the pod network, I’ve installed the first one, also it seems to be tested with
e2e, which seems to be CNCF standards. - Skip
Joining nodesif you do not plane to install many nodes. - At this point, you should have a single control-plane cluster installed.
- If you want to
kubectl runimages, you will need to untaint the master:
kubectl taint nodes --all node-role.kubernetes.io/master-
The end is the beginning…
So here we are at the end of this post, thank you if you’ve read me up until now. My feelings are that Docker is easy to install, it’s really well integrated with Linux, even if I prefer FreeBSD. Also, Kubernetes is really nice, I’m just peeling the onion slowly.
At this point, I’ve already tried 2 (3 in fact…) other products installations with Kubernetes:
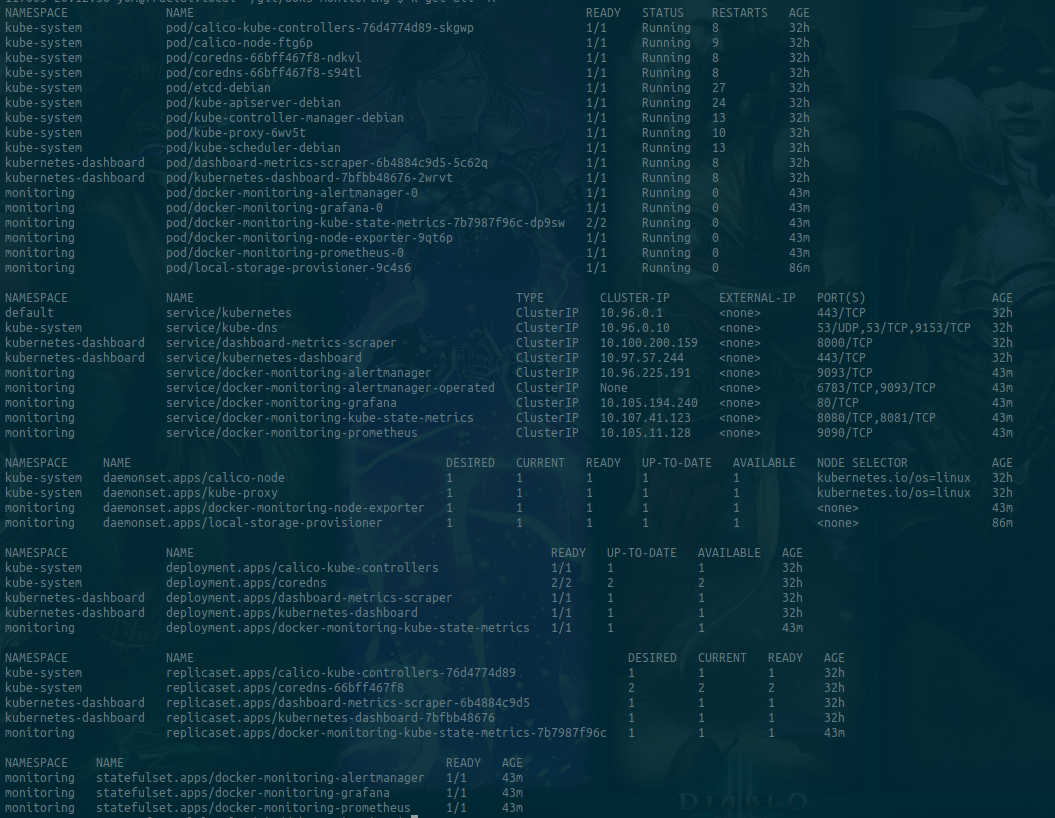
- Kubernetes Dashboard: This one is nice to have a Web UI to watch what’s in your Kubernetes cluser
- How To Set Up a Kubernetes Monitoring Stack with Prometheus, Grafana and Alertmanager on DigitalOcean: And this one, although it’s about DigitalOcean Kubernetes… I’ve managed to install in my Kubernetes cluster, that was a lot of searching and testing because they are using DigitalOcean Kubernetes capabilities such as creating DO Block Storage. To that end, I had to install a Static provisioner of local volumes (the 3rd product 😋), and a Kubernetes Storage Class that would mimics at least the
do-block-storagestorage class in a very “simple” way.
Clearly, that was a lot of time invested, but I’m quite happy since I’ve discovered and learnt quite some informations. I’m really well aware that it’s a lot of informations to handle, but if you’ve got some time to kill, it’s really worth the trip.
Eye Candy: